
Are you ready to create a cool backpack drawing with ease? Whether you’re a beginner or just want a quick, simple guide, this step-by-step tutorial is made for you.
You don’t need fancy tools or special skills—just a pencil, some paper, and a little bit of patience. By the end, you’ll have a neat backpack sketch that you can be proud of. Keep reading, and let’s make drawing fun and stress-free!
Materials Needed
Drawing a backpack is fun and easy. To start, gather the right materials. Having simple tools helps you focus on your drawing. These materials are easy to find and use.
Pencil
A pencil is the best tool to begin your sketch. It lets you draw lines softly and erase mistakes. Choose a pencil that feels comfortable in your hand.
Eraser
An eraser fixes errors and cleans your drawing. A soft eraser works well without damaging the paper. It keeps your work neat and tidy.
Paper
Use plain white paper for your backpack drawing. Smooth paper helps pencils glide easily. Choose a size that fits your workspace.
Colored Pencils Or Markers
Add colors to your backpack with colored pencils or markers. They bring your drawing to life. Pick colors that match your style or favorite backpack.
Basic Backpack Shape
Starting with the basic shape of a backpack makes drawing easier. Focus on simple forms first. This helps you build a strong base. The backpack’s main shape is like a rectangle with soft edges. Keep your lines light. It will be easier to add details later.
Drawing The Main Body
Begin by sketching a vertical rectangle. Round the corners slightly to create a soft look. This shape is the main body of the backpack. Make it tall and wide enough to look like a real bag. Leave space at the top for the flap. Use smooth, even lines to keep the shape neat.
Adding The Top Flap
Next, draw the top flap over the rectangle. This flap covers the backpack’s opening. Draw a curved line that connects the two upper corners. The curve should dip slightly in the middle. This gives the flap a natural, folded look. Add a small line under the flap to show where it folds over the bag.
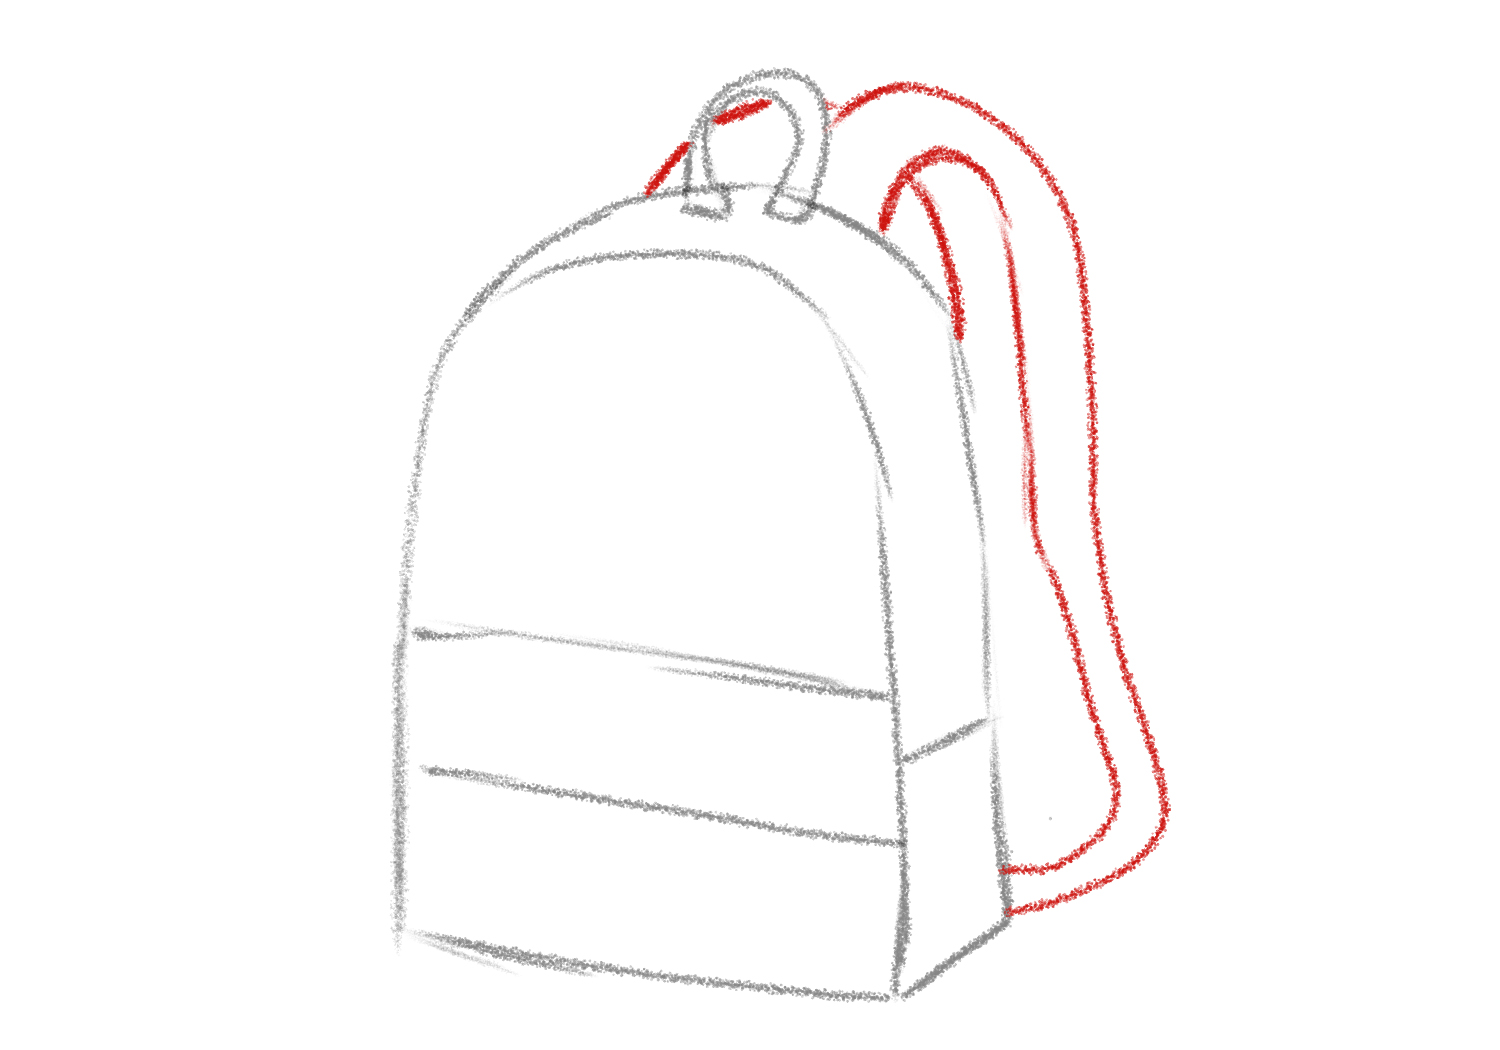
Creating Straps And Handles
Creating straps and handles is an important step in drawing a backpack. These parts make the backpack look real and complete. They also show how the backpack will be carried. Keep your lines simple and smooth for a clear look. Use light strokes first to get the shape right.
Drawing Shoulder Straps
Start by drawing two curved lines from the top corners of the backpack. These lines should bend gently toward the bottom. Make the straps wide enough to look strong and comfortable. Add a little thickness by drawing parallel lines next to the first ones. Connect the ends with small curved lines to close the straps. You can add small details like stitching or padding for a realistic touch.
Adding The Carry Handle
Draw a small, curved rectangle on the top center of the backpack. This is the carry handle. Keep the shape simple and slightly rounded. Make it thick enough to look sturdy. Connect the handle smoothly to the backpack’s top part. You can add a shadow or line inside the handle to show depth. This step gives your drawing a finished and practical look.
Detailing Pockets And Zippers
Detailing pockets and zippers gives your backpack drawing more life and realism. These small parts show how the backpack works and what it can hold. Adding clear lines and shapes helps make the drawing look neat and complete.
Focus on the shape and placement of each pocket. Zippers add texture and a sense of function. Use simple strokes to sketch zipper teeth and pull tabs. These details make your backpack look useful and ready to carry things.
Front Pocket Design
Start by drawing the front pocket as a smaller rectangle on the main bag. Keep the edges soft and slightly rounded. Add a zipper line near the top edge of the pocket. Draw small zipper teeth along the line with short, even strokes.
Sketch a zipper pull tab hanging from one end of the zipper line. Use a small oval or rectangle shape for the tab. Show a slight opening or flap above the zipper to add depth. You can add stitching lines around the pocket for more detail.
Side Pockets And Zippers
Side pockets are usually slimmer and taller than the front pocket. Draw them on each side of the backpack with curved or straight edges. Add vertical or diagonal zipper lines depending on the style you want. Keep zipper teeth small but clear.
Include zipper pull tabs on each side pocket zipper. These tabs can hang down or point outward. Draw the pockets slightly bulging to suggest space inside. This makes your backpack drawing look practical and ready for use.
Adding Texture And Shading
Adding texture and shading brings your backpack drawing to life. It shows fabric details and makes the sketch look real. Simple lines and shadows can create a soft, worn fabric or a smooth, new one. These effects help viewers feel the material and shape of the backpack.
Highlighting Fabric Folds
Fabric folds show how the backpack bends and moves. Draw light, curved lines where the fabric creases. Make the lines closer together for deeper folds. Use soft strokes to avoid harsh edges. These lines tell the story of the backpack’s shape and how it wears.
Shading For Depth
Shading gives the backpack a 3D look. Shade the sides that get less light. Use darker pencil strokes in shadow areas. Blend gently to create smooth transitions. This contrast between light and dark makes the backpack pop off the page.

Credit: www.youtube.com
Coloring Your Drawing
Coloring your backpack drawing brings it to life. This step makes your art bright and fun. It helps show the backpack’s style and texture. Choosing the right colors and using simple techniques makes a big difference. Let’s explore how to pick colors and add them nicely.
Choosing Colors
Pick colors that match the backpack’s look you want. Use basic colors like blue, red, or green for a classic feel. Soft colors like pastel pink or light blue give a calm look. Think about the backpack’s material. Bright colors work well for nylon or plastic. Earth tones fit leather or canvas backpacks.
Limit your palette to two or three colors. This keeps the drawing clear and not too busy. Try to match colors that go well together. Use a color wheel for help if unsure. The right colors make your drawing pop and feel real.
Applying Color Techniques
Start coloring with light strokes. This helps avoid mistakes and uneven patches. Use small circles or straight lines to fill spaces smoothly. Blend colors gently for soft shadows and highlights. Use a darker color for the edges to add depth. Light colors in the middle make parts look raised or shiny.
Keep your coloring neat by staying inside the lines. Color the straps and zippers carefully to show details. Use a clean brush or pencil tip for fine parts. Layer colors slowly, building up tones step-by-step. This gives your drawing a smooth and natural look.
Final Touches
The final touches bring your backpack drawing to life. This stage makes your art clear and neat. Small details and clean lines improve the overall look. Your drawing feels complete and ready to show.
Outlining And Clean-up
Start by outlining the main shapes with a fine pen or dark pencil. Trace over your best lines carefully. Erase extra pencil marks and rough sketches. Remove any smudges or stray lines. This step makes your backpack look sharp and tidy. It helps the viewer see all parts clearly.
Adding Background Elements
Simple background elements add context to your drawing. Draw a flat surface or shadow under the backpack. You can add a school desk or park bench. Keep these elements light and not too detailed. This keeps the focus on your backpack. Backgrounds create a sense of place and depth. They make your drawing more interesting and complete.

Credit: cyberbackpack.com
Credit: designbundles.net
Frequently Asked Questions
How Do I Start Drawing A Backpack Easily?
Begin by sketching the backpack’s basic shape using simple rectangles and curves. Focus on the outline first. Add details like straps and pockets after the main shape is clear. This step-by-step approach keeps the drawing simple and manageable.
What Materials Are Best For Drawing Backpacks?
Use pencils for initial sketches to easily erase mistakes. Fine-tip pens or markers work well for outlining. Colored pencils or markers add vibrant details. Choose smooth paper to prevent smudging and enhance your drawing quality.
How Can I Add Realistic Details To My Backpack Drawing?
Include elements like zippers, buckles, and fabric folds. Observe real backpacks for reference. Use shading techniques to create depth and texture. Small details make your drawing look more lifelike and appealing.
What Common Mistakes Should I Avoid When Drawing Backpacks?
Avoid drawing too many complex details at once. Don’t ignore proportions; keep the straps and pockets balanced. Avoid heavy shading early; build shadows gradually. These tips help maintain clarity and accuracy in your drawing.
Conclusion
Drawing a backpack can be simple and fun. Practice each step slowly. Use basic shapes to guide your lines. Don’t worry about mistakes; they help you learn. Try different styles and add your own touch. Keep practicing and your drawings will improve.
Enjoy the process and be patient. You can create backpacks with ease and confidence. Just start, keep going, and watch your skills grow.