Have you ever wondered how to make a backpack using just paper? Imagine creating something practical, stylish, and eco-friendly with your own hands.
Making a paper backpack is easier than you think, and once you learn the simple steps, you’ll impress your friends and enjoy a unique accessory that stands out. Ready to discover how you can turn a simple sheet of paper into a cool, functional backpack?
Keep reading, and you’ll find out exactly how to do it—step by step.

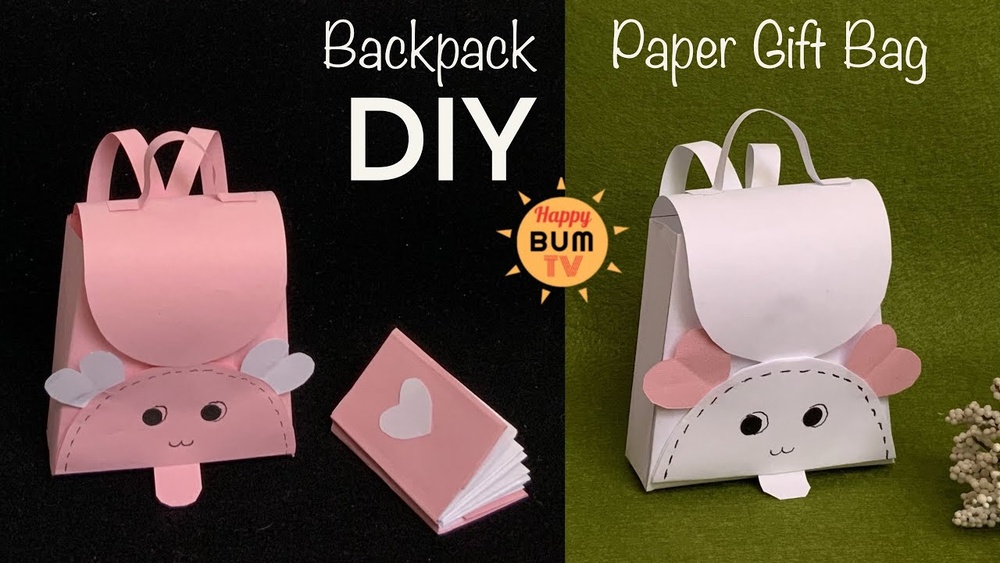
Credit: www.cardstock-warehouse.com
Materials Needed
Gathering the right materials is the first step to making a paper backpack. Each item plays a key role in creating a sturdy and good-looking backpack.
Choose materials that are easy to handle. This will make the process smoother and more enjoyable.
Paper
Use thick paper like cardstock or kraft paper. Thin paper can tear easily. Colored or patterned paper adds style.
Glue
White glue or a glue stick works well. It should dry clear and hold paper pieces firmly together.
Scissors
Sharp scissors help cut paper cleanly. Avoid dull scissors to prevent rough edges or tears.
Ruler
A ruler helps measure and make straight lines. Accuracy is important for neat folds and cuts.
Markers Or Pens
Use these to decorate and add details. Choose colors that match or contrast with the paper.
String Or Ribbon
String or ribbon can be used for backpack straps. Pick a length that fits comfortably.
Clips Or Clothespins
Clips hold glued parts while drying. They keep everything in place for a strong bond.
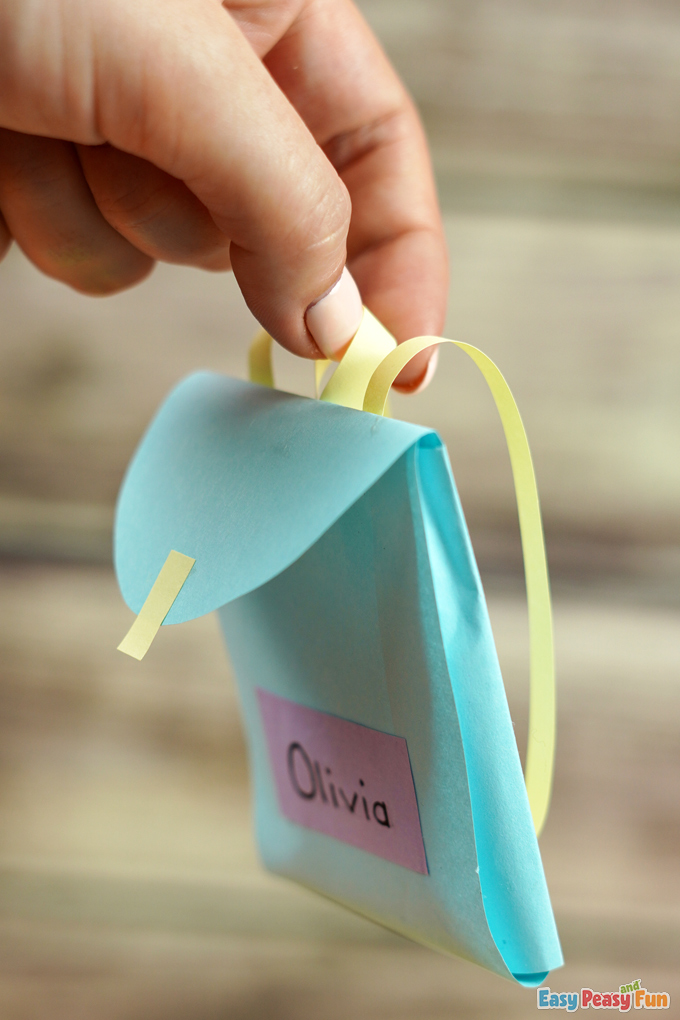
Credit: www.easypeasyandfun.com
Preparing The Paper
Preparing the paper is the first step in making a paper backpack. This step helps your backpack hold its shape. It also makes folding and assembling easier.
Choosing the right paper and cutting it properly is very important. Strong paper helps your backpack last longer. Thin paper can tear easily and will not hold well.
Choosing The Right Paper
Select thick paper like cardstock or craft paper. These types support weight better. Avoid thin printer paper, as it rips quickly.
Colored or patterned paper can make your backpack look nice. Plain paper works well for practice or simple designs.
Measuring And Cutting
Measure your paper carefully before cutting. Use a ruler and pencil for straight lines. Cut the paper into a square or rectangle as needed.
Clean cuts help folds stay neat. Use sharp scissors or a craft knife to avoid rough edges.
Strengthening The Paper
Strengthen the paper by adding layers. Glue two sheets together for extra support. Let the glue dry completely before folding.
You can also use clear tape on edges. Tape prevents tearing and adds durability. Avoid over-taping, which can make folding harder.
Cutting The Paper Pieces
Cutting the paper pieces is the first important step in making a paper backpack. Precise cuts help the backpack look neat and fit together well. Taking time here makes the next steps easier.
Use a ruler and pencil to mark the paper before cutting. This helps keep the shapes straight and the sizes accurate. Always double-check your measurements to avoid mistakes.
Choosing The Right Paper Size
Select paper large enough for your backpack parts. Standard A4 or letter size can work, but bigger sheets give more space. Bigger pieces mean fewer joins and a stronger backpack.
Marking The Paper For Cutting
Draw clear lines on the paper with a pencil and ruler. Mark each part carefully to match your backpack design. Clear marks guide your scissors or knife for clean cuts.
Using The Best Cutting Tools
Use sharp scissors or a craft knife for smooth edges. Blunt tools can tear the paper or create jagged cuts. A cutting mat protects your surface and keeps cuts clean.
Cutting Along The Lines
Cut slowly and follow the marked lines exactly. Straight cuts make folding and gluing easier later. Take your time to keep pieces even and tidy.
Folding Techniques
Folding techniques are the heart of making a paper backpack. They shape the paper into a strong, useful form. Good folds give the backpack its structure and style. Each fold must be sharp and exact.
Simple folds can turn a flat sheet into a 3D object. Follow each step carefully. Patience helps create neat, clean lines.
Start with a square piece of paper. Use thick paper for durability. Smooth the paper to remove any wrinkles. This makes folding easier and cleaner.
Basic Folds To Know
Learn valley and mountain folds first. Valley folds bend the paper inward. Mountain folds bend the paper outward. These basic folds build the backpack’s shape.
Creating The Backpack Shape
Fold the paper in half diagonally. Open it and fold the edges to the center. This forms the main body of the backpack. Make sure edges line up well.
Making The Straps
Use thin strips from leftover paper. Fold them into thin, sturdy bands. Attach these carefully to the backpack body. Straps add realism and function.
Final Touches
Press all folds firmly for strength. Check for loose edges or gaps. Adjust folds to improve stability. A well-folded backpack holds its shape longer.
Assembling The Backpack
Assembling the paper backpack is the step where your project starts to take shape. You will bring together all the folded parts and create the structure of the backpack. Careful folding and gluing make the backpack strong and usable.
Joining The Sides
Start by attaching the side panels to the main body. Use glue along the edges for a firm hold. Press the sides gently but firmly. Hold them in place until the glue dries a bit. This connection forms the walls of your backpack.
Creating The Base
Next, fold the bottom flap to create the base. Apply glue on the edges of the base flap. Attach it carefully to the bottom edges of the sides. Make sure the base is flat and secure. This step supports the weight inside the backpack.
Adding The Flaps
Finally, fold and attach the top flaps. These flaps close the backpack and protect the inside. Glue the edges and press the flaps firmly. Let the glue dry completely before using the backpack. Your paper backpack is now ready to carry light items.
Adding Straps
Adding straps to your paper backpack is an important step. Straps let you carry the backpack easily on your shoulders. Paper straps need to be strong and well attached. This part focuses on making and attaching straps that hold up well.
Making Paper Straps
Start by cutting long strips of sturdy paper. Use thick paper or fold thin paper several times. This makes the straps stronger and less likely to tear. Keep the strips about 1 to 2 inches wide. The length depends on the size of your backpack and your comfort. You can also twist or braid the strips for extra strength. Make two straps of equal length for balance.
Attaching The Straps
Attach the straps at the top and bottom of the backpack. Use strong glue to stick the ends firmly. Press the glued areas for a few minutes to hold well. For extra strength, reinforce with tape or small paper tabs. Make sure the straps do not move or slip. Test by gently pulling on each strap. Adjust if needed before the glue dries.
Decorating Your Backpack
Decorating your paper backpack makes it unique and fun. It lets you show your style and creativity. Simple decorations turn a plain backpack into a cool accessory. Choose colors and designs that you love. Personal touches make your backpack special and one of a kind.
Painting And Drawing
Use water-based paints for bright and safe colors. Paint simple shapes or patterns like stripes or dots. Drawing with markers works well for fine details. Try flowers, stars, or your initials. Let each layer dry before adding more colors. Keep your strokes light to avoid tearing the paper.
Adding Stickers Or Embellishments
Stickers add instant style and are easy to apply. Use themed stickers like animals, cartoons, or nature. Small gems or buttons create a 3D effect. Glue paper cutouts for extra decoration. Avoid heavy items that may break your backpack. Press decorations firmly to make them stick well.

Credit: www.youtube.com
Tips For Durability
Making a paper backpack is a fun craft project. To keep it strong and useful, focus on durability. A sturdy paper backpack lasts longer and holds items safely. Small steps can make a big difference in strength.
Use the right materials and techniques. This helps the backpack resist tears and wear. Follow these tips for a durable paper backpack.
Choose Thick Paper Or Cardstock
Start with heavy paper or cardstock. Thin paper tears easily. Thick paper holds its shape better. Cardstock is a great choice for strength and flexibility.
Reinforce Edges And Seams
Edges and seams face the most stress. Use extra glue or tape on these parts. Fold edges carefully to avoid weak spots. Reinforcement stops tearing and increases lifespan.
Apply A Protective Coating
Coat your backpack with a waterproof spray or clear glue. This protects from moisture and dirt. A sealed surface also makes the paper stronger. Let the coating dry fully before use.
Use Strong Adhesives
Choose glue that bonds well with paper. Avoid weak or fast-drying glues that break easily. White craft glue or hot glue works well. Press glued parts firmly until dry.
Add Internal Supports
Insert cardboard pieces inside the backpack. This adds structure and stops bending. Use thin cardboard for light support. Place it under the base and walls for stability.
Common Mistakes To Avoid
Making a paper backpack is fun but tricky. Many beginners make simple mistakes. These errors can ruin your final product or make it weak. Avoiding common mistakes helps create a strong and neat backpack. Here are some typical errors to watch out for.
Using Thin Or Weak Paper
Thin paper tears easily and cannot hold weight. Choose thick craft paper or cardboard. Strong materials last longer and support your items well.
Ignoring Precise Measurements
Cutting paper without exact sizes causes poor fitting parts. Measure twice, cut once. Accurate cuts make assembly easier and the backpack look better.
Skipping Proper Folding Techniques
Bad folds create uneven shapes and weak spots. Use a ruler or bone folder for sharp folds. Clean folds keep the backpack sturdy and tidy.
Not Reinforcing Stress Points
Areas like straps and corners bear most weight. Reinforce them with extra layers or tape. Weak spots break quickly without support.
Using Wrong Glue Or Not Letting It Dry
Some glues do not stick well to paper. Use strong, fast-drying glue suitable for paper. Let glue dry completely before using the backpack.
Overloading The Backpack
Packing heavy items can tear or break the paper. Keep the load light and balanced. Overloading shortens the backpack’s life.
Frequently Asked Questions
How Do You Start Making A Paper Backpack?
Begin by choosing sturdy paper like kraft or construction paper. Measure and cut the paper according to your desired backpack size. Fold and crease the paper precisely to form the base and sides. Use glue or tape to secure the folds firmly for a durable structure.
What Materials Are Needed For A Paper Backpack?
You need strong paper, scissors, glue, tape, and a ruler. Optional items include markers for decoration and string or ribbon for straps. Using quality materials ensures your paper backpack is sturdy and functional. Always choose eco-friendly paper for a sustainable project.
Can A Paper Backpack Hold Heavy Items?
Paper backpacks are best for light items only. They can carry small, lightweight objects like stationery or snacks. Avoid heavy or sharp items as they can tear the paper easily. Reinforce the base and straps for better durability if needed.
How Long Does A Paper Backpack Last?
A paper backpack lasts a few days to weeks, depending on use. Exposure to moisture or rough handling reduces its lifespan. Storing it in a dry place prolongs its usability. It’s ideal for short-term, creative projects or light use.
Conclusion
Making a paper backpack is simple and fun. You only need paper, glue, and some patience. This project helps you practice creativity and crafting skills. It also teaches how to recycle and reuse materials. You can customize the backpack with colors or drawings.
Try different sizes and shapes for variety. This activity suits all ages and brings joy. Start today and enjoy your handmade paper backpack!